


Finishing my Part 1 degree in Architecture and heading out into the working world of architecture I thought great! no more late nights of university work. And this should be the case, the only thing you have to do (other than your working day) towards your Architect’s qualification is fill in your PEDR’s. Sound’s simple enough, yet universities seem to offer little guidance on how you actually go about doing this. If your lucky people in your practice will help you out, but you tend to rely on your fellow students all helping each other out with bits of information you’ve each heard.
Of course your university will also tell you that they are the best place to do your PEDR’s with as they want you to pay them the ridiculously over priced fees to get them signed off. But this is not always the case.
My aim in this post is to help any fellow students out as you embark on your PEDR journey with all the information and advise I have gained from universities, fellow students at various stages of their education, young architects, practices and my own experience.
I hope it helps you out, relieves some stress and reduces the number of hours spent on writing yours.
What are PEDR’s?
The RIBA definition is : The Professional Experience and Development Record has been written by the Royal Institute of British Architects to help architectural students record their professional experience and development in the workplace as part of their minimum seven years’ education and training leading to qualification as an architect.
They are basically diaries of what you are getting up to whilst you are out working in practice where you can record relevant experiences both in and out of work.
When and for how long do you need to do these?
Once you finish your part 1 Degree in Architecture most people will go out and work in Architectural practices or relevant other jobs (i.e still involved with the construction industry). This is when you begin your PEDR records and at this stage will need a minimum of 12 months recorded. HOWEVER there are options here:
- You may decide to go straight into your Part 2 MArch Architecture without taking anytime to work in practice. Although I would personally advise against this route, this is not a problem when it comes to PEDR records. You will be able to complete the records missed after completing you Part 2. However you will need two years (24 Months) of PEDR records before you are able to take your Part 3.
- Depending on the jobs available you may only be able to get a few months in practice, or decided to take some time out to travel etc. This is also fine, record what you do, however many months this may be and you can complete the rest after Part 2. E.g. If you work for 6 months, you will need to complete 18 Months post Part 2 before your Part 3. I would however recommend doing at least 6 months as most universities will make you pay for the whole year’s worth of PEDR records, therefore it could be expensive.
- If you decide you want to continue your Part 2 part time and are lucky enough to find a firm to employ you, you will still have to sign up to get your PEDR’s signed however will be able to get the required experience whilst studying and go straight into your Part 3 when you graduate from Part 2.
- If you decide to take additional time out working, like myself they you have options. You will need to record up to 12 months of working, however after this it is up to you whether you want to continue writing records. You are not required to continue recording if you do not wish too. Things worth considering are:
- You will have to pay for an additional years worth of fees. If your only staying for a couple of extra months this may not be worth it.
- If you decide not to carry on, you could miss recording some important experience. By 12 months you have more experience and (hopefully) the practice are trusting you with more advanced work. This could look excellent on your records and may be worth paying the extra fees.
- If you take just the year out and return to university, then you just need to pay for a years worth of fees and head back to university to complete your part 2. After your part 2 you will once again record 12 months of PEDR’s before you can complete your Part 3.
Where and how do I sign up?
There are two parts that you need to sign up to in order to record your PEDR’s:
- A university or though the RIBA
You need to sign up to a years enrolment on to a PEDR course in order to get your records checked and signed off. Most universities off this service or if you wish you can go through a RIBA organisation called The RIBA North West Region.
The RIBA North West Region is responsible for the PEDR monitoring of the students of the two Liverpool universities and the Manchester School of Architecture. The Region has also set up a PEDR signing scheme for students who do not have access to a Professional Studies Advisor. This is available to students undertaking their year out between Part 1 and Part 2 and to those at post Part 2 stage who have not yet started a Part 3 programme. It is also available to graduates of overseas courses who have obtained Part 1 and/or Part 2 through the Architects Registration Board’s Prescribed Examination process.
Warning: There seems to be a fairly strong consensus between students that if you go down this route you may have to wait a long time to receive feedback and a signature on each of your sheets. This may mean you spend a lot of time chasing them up.
If you decide to with a university you do not have to do with the university where you previously studied. It is worth shopping around. Although universities will promise you ‘extras’ at the end of the day you are paying for them to sign a pieces of paper. So in my experience and speaking to fellow students there isn’t much point paying more. What it is worth doing, is speaking to other students about where they went and their experience.
2. Signing up to the PEDR website
As well as signing up to a university or with the RIBA you also need to register on the site where you will be filling in your PEDR Records.
http://www.pedr.co.uk/
This website is where you physically write up your records before sending them off to the university. You can sign up for 6 month, or 13 month periods, and within this time you can submit as many records as you like. In between the periods of writing up, your records will be kept on the website, you just won’t be able to write anymore until you have paid for another period of write ups.
NOTE: The time period you’ve signed up for starts from the day you pay, not from the day you submit your first record. Therefore its worth waiting until you’ve worked your first three months before signing up to make the most of your money.
What fee’s are involved?
- University/The RIBA North West Region
University fees tend to vary between universities and change slightly each year. This is why it is worth doing your research and finding out how much each charges before you end up paying more for the same deal. Some universities will also offer you a discounted price if you signed up, and pay upfront for both years of your PEDR’s.
I went with UCLAN (University of Central Lancashire) which was £100 for the year in 2015. I believe it has however gone up since then. Most universities will charge you between £200 and £300 per year.
The RIBA North West Region PEDR Monitoring Fee is £200 + VAT (£240) per 12 months. This does not include the fee for the PEDR website.
Personally I think the amount charged is extortionate for the service received. (And I speak about all universities here). The better universities will put on a few call back days where you can ask questions and get answers however not all do this. Most universities seem to take months to send back your records and rarely write more than a few words and offer little guidance. It is also unusual for them to check up on how you are finding your placement or to offer help. You will probably find you are waiting 3 months + to get sheets back. I would advise to start hassling them after 2 months otherwise if can get forgotten. Unfortunately this is a requirement to becoming an architect and most places charge a similar amount, so these fees can’t really be avoided.
So now your all signed up, how do you actually fill in the sheets?
To fill in your PEDR sheet you will have needed to pay the PEDR website fee.
NOTE: If you have not heard back from your university you can still beginning filling in your PEDR’s as this fee is separate and just submit them to the university once that side is sorted.
So once you sign in you’ll see this interface.
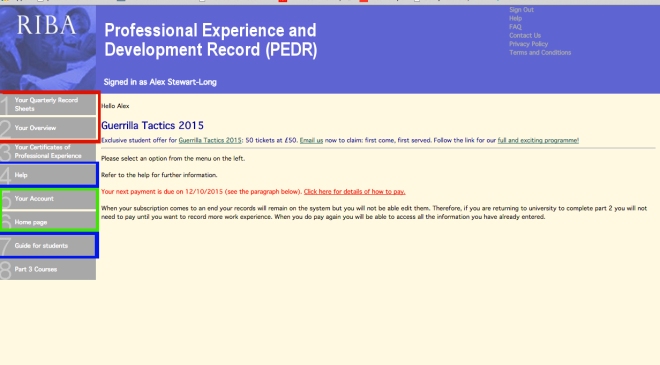
Red Boxes
The red boxes show the areas you will need you use the most whilst filing in you PEDR’s.
- Your Quarterly records: This is where you will set up each record and fill them in.
- Your Overview: You need this section at the end of your part 1 placement and at the end of Part 2 placement. DO NOT FILL IN THIS SECTION UNTIL THE END OF YOUR PLACEMENTS.
Blue Boxes
These sections offer a little guidance to help you fill in your sheets.
Green Boxes
These are pretty self explanatory.
Click on Your Quarterly Record Sheets
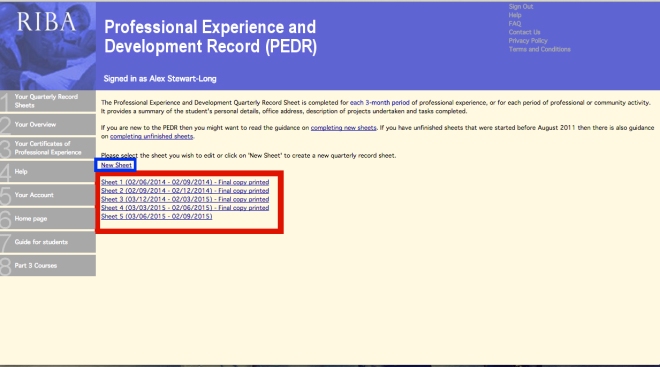
Red Box :This is where your previously submitted sheets are recorded. It will say ‘Final Copy Printed’ next to it once you have the copy that is sent to the university.
Blue Box: This is where you click to set up a new sheet
Click, New Sheet
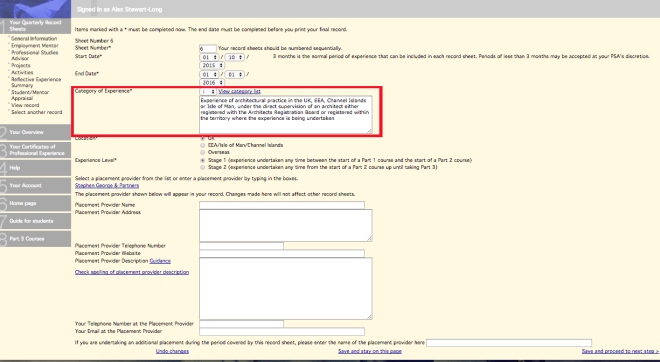
Sheet number : Well of course start from 1.
Start date and end date : From your first day of placement to exactly three months later. e.g. Sheet 1:1st October 2015- 1st January 2016, Sheet 2: 2nd January 2016 -1st April 2016
Category of Experience : Now this part depends on where you are working, depending if it’s in the UK, abroad or whether your working in an architect’s firm or another area of the construction industry.
i) Experience of architectural practice in the UK, EEA, Channel Islands or Isle of Man, under the direct supervision of an architect either registered with the Architects Registration Board or registered within the territory where the experience is being undertaken.
ii) Experience of architectural practice in any other location, under the direct supervision of an architect registered within the territory where the experience is being undertaken.
iii) Experience within the construction industry under the supervision of a qualified professional within the relevant field.
When you click the drop down arrow on this part, it will automatically fill in the box below with the relative information listed above.
Location : Self explanatory
Experience level : Stage 1 : Part 1 placement , Stage 2 : Part 2 placement
Placement Provider details: The name of the firm you are working for and their address, telephone number and website.
Placement Provider Description: It’s worth asking your placement for this as they usually have a description on their website or portfolios. Try to include:
- Workload (type) & location of
- Date organisation formed
- Type of organisation (e.g. LLP, Limited Company, Charity, Local Authority etc)
- No. of staff
- Turnover (if possible to find out)
- Any other useful info – e.g. mergers, history etc
Your Telephone Number and email address at the Placement Provider: Your work number & email
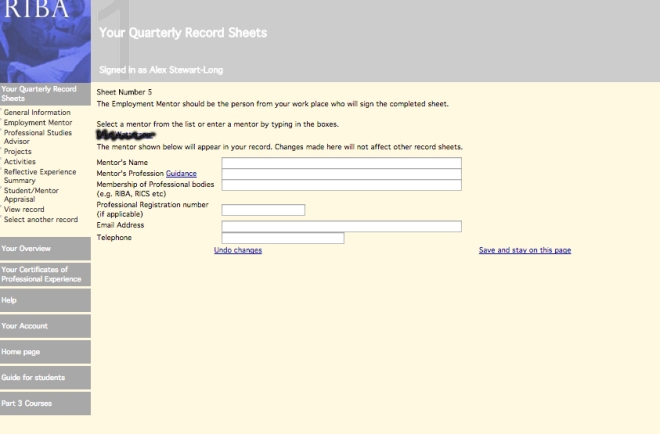
Next Page is your Work Mentors Information
Who your work mentor is will depend on your practice. Depending on the size of the company it is often the director of the team you work in, or the partner of the firm in smaller practices. Sometimes if people are busy you may have to ask a qualified architect in the firm who is willing to take the time to help you. It is best to try and get an architect you work directly with if possible. I would recommend asking your boss who they would like your to use as your mentor first as your firm may have a protocol.
Next is your Professional Studies Advisor
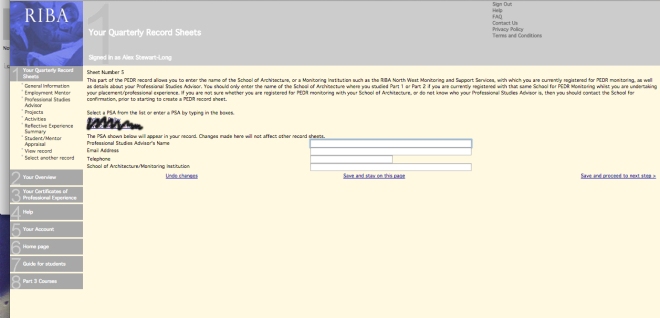
When you enrol at a university or with the RIBA you will be assigned a professional studies advisor who will sign off you sheets. This is where you fill in their information. If you don’t have this yet you can always come back to this page later.
Onto Projects. . .
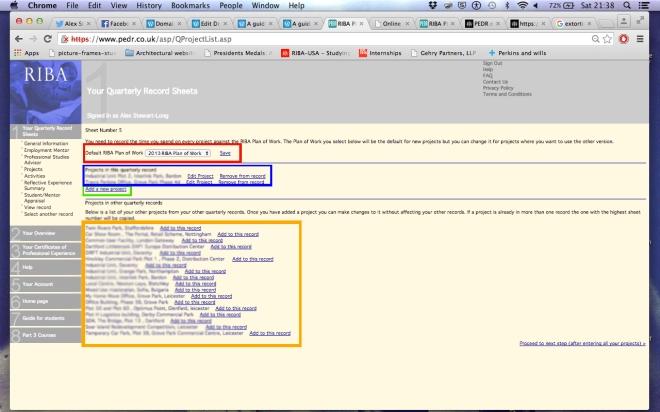
Red Box : If you started working after 2013 you need to make sure this box says 2013 RIBA Plan of Work instead of 2007. The RIBA Plan of works as changed from the A-J stages to 1-5 Stages.
Blue Box : This shows the list of project you have worked on during this 3 month period and that you will be adding to. If you have continued to work on a project from your last 3 month period you can add this project to this blue box from the orange box below by clicking “Add to the Record” next to the project you wish to add.
Green Box : If you need to add a new project to the record you click this button.
Orange box : This is where projects listed in previous sheets are stored. If you are still working on them add them to the sheet, if not you can just leave them listed here.
Lets add a new project. . .
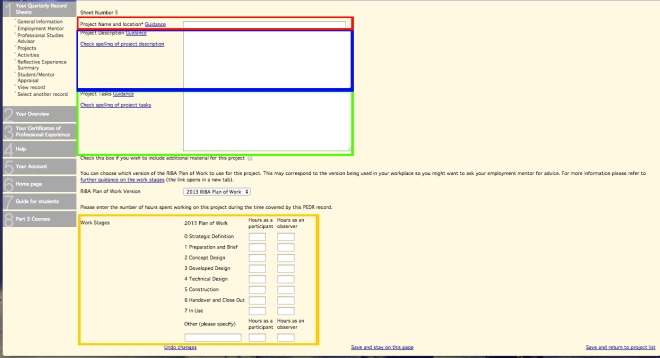
Red Box : Project name and location e.g Clarks Office Building, Buckingham or Industrial Unit, Hope Business Park, Newcastle
Blue Box : This is the project description, you will most likely need to speak to your mentor in the office to gain some of this information, or if you have a data base system that is also a good place to look. The Guidance button next to the title is quite useful to explain what you need to write.
- Client type & name (if appropriate)
- Project scope (size and budget)
- Form of appointment
- Procurement route
- Type of building contract
- Consultant/design team
- Programme
- Current work stage
Green Box : This is the ‘diary’ part where you write what you have been up to. It needs to be written in a professional manner and be precise. You can summarise and write key elements. For example:
Do not write: I worked elevations and then i worked on the plans , i then also worked on some sections and sent them to the contractor.
Instead write: Tasked with finishing of the elevations, plans and sections of the office’s which were then sent to the contractor for comment.
If you work on these drawings multiply times, summaries the work rather than writing it in chronological order.
I would also advise writing SHEET 1 : 3 Months at the beginning as your next sheet will continue on in this section and this makes it clearer for your mentors to distinguish which parts are in which 3 month period. (e.g put SHEET 2: 6 Months before starting the next 3 month period).
Summarise the tasks undertaken on project, you may wish to refer to the below list of examples. The entries in this section will be of considerable value to the professional examiner and should include your reflection on any problems encountered and responsibilities undertaken during the project task.
- Drawings – of what – type e.g. scale, hand, sketches, life, working
- Modelling – type e.g. BIM/CAD, cardboard, exhibition
- Communication – to whom – type e.g. letters, emails, AIs, CVIs
- Meetings – with whom – outcome – action points
- Site visits – what purpose – measure, contract administration, learning involved
Yellow Box :
RIBA Plan of Work has been the definitive UK model for the building design and construction process, and something you will use through out your career.
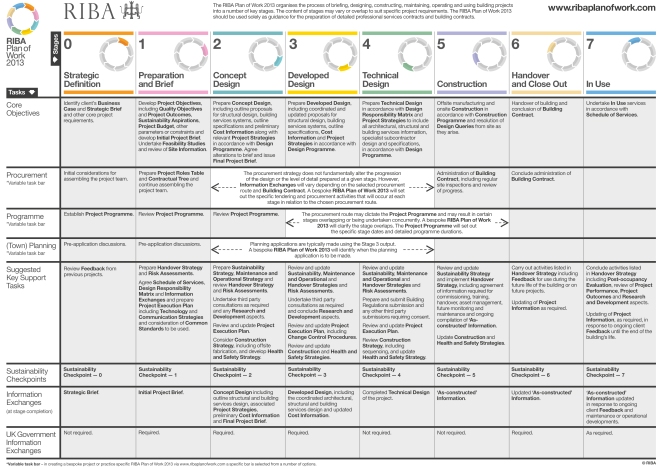
As you fill out your PEDR records you will start to understand which stage of work the work you are doing comes under, however for the first few months it can be quite confusing and again is worth speaking to your mentor as to which stage you are working on.
There is also a guide HERE.
You will see there are two columns in which you can put your hours; participant and observer. It is good to get hours in both columns. Observer hours included things such as sitting down with your director and being taught how to produce certain drawings you haven’t yet done before. Participant is when you do the work yourself e.g. you produce these drawings on another project yourself. If your mentor sits you down to teach you about things such as contracts, CDM roles etc this counts as observer.
You need experience in all stages of The RIBA Stages of Works by the time you take your Part 3 exam. But do not fear, you are likely to only gain experience in a few areas during your part one placement, your part 2 placement it is more important that you push for experience in a range of areas. However the more hours you get in each stage, the better!
Next, Activities. . .
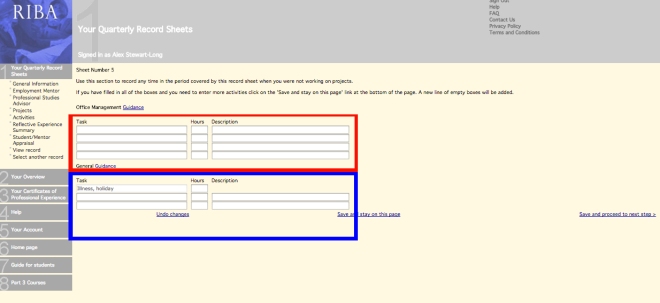
Now this section is quite important and is often not filled in correctly or showing a students full experience. This is where you fill in everything else you’ve done other than your day to day job.
Red Box :
This part you should record the following:
- Strategy and organisation
- Marketing
- Finance
- Quality assurance
This is really if you get involved in the business side of things. For example you may be invited to comment of the new design of the companies website, or have a sit down with a member of staff to talk through the companies organisation and peoples roles.
Blue Box :
CPD’s (Continuing professional development): You are required to have 35 hours of CPD per year. You place of work usually will arrange this on regular occurrence but you can also count a lot of additional things as CPD’s.
- Reading architecture magazines or books
- attending events such as lecturers, exhibitions, seminars.
- Recall day attendance
If you get involved with career’s fairs or competitions these can also be recorded in this section.
Additional things you should include:
- Part 3 course attendance
- Illness absence
- Annual leave
- Building visit
- Exhibition attended
These should all be recorded here with how many hours you spend on them. It is really important to record everything extra you are doing on your year out as it shows you are enthusiastic and making the most of your experiences.
Reflective Experience. . .
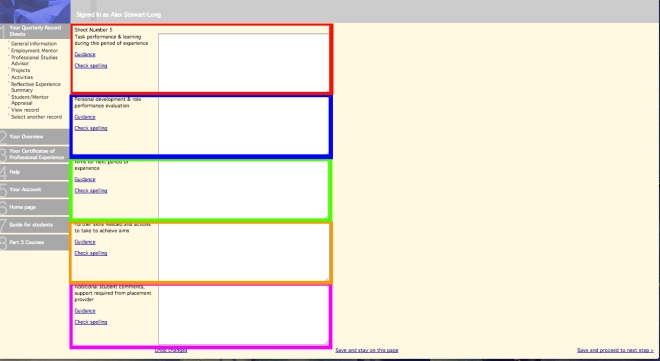
I found this section the hardest. You had to compliment and critique yourself, which is never fun!
Red Box : Task performance & Learning during this period of Experience is talking about the actual work you did and how well you produced it. E.g you produced a floor plan with the correct wall thicknesses, line types and to british standards. What you learnt in this period can be things like, you learnt the correct number of parking spaces in relation to a buildings size or the minimum dimensions for an accessible toilet.
Blue Box : Personal development & role performance evaluation is talking about how you have grown as a person. E.g you have grown in confidence when speaking to clients, you have improved when gaining experience from contractors over the phone meaning you can work more independently. You may critique yourself and say such things as you need to double check your drawings before sending them out to avoid mistakes.
Orange Box :Aims for next period of experience. This is where you think about what areas of experience you are missing or what you can do next to improve both your personal development and task performance.
Green Box : Further skills needed and actions to take to achieve aims. This is is how you are going to achieve your aims for the next period. You can write about any events you have coming up and how this are going to help you improve your skills.
Pink Box : Additional student comments, support required from placement provider. If you feel like your not getting the experience you should be at your placement you can comment here and your professional adviser at the university should help you change this.
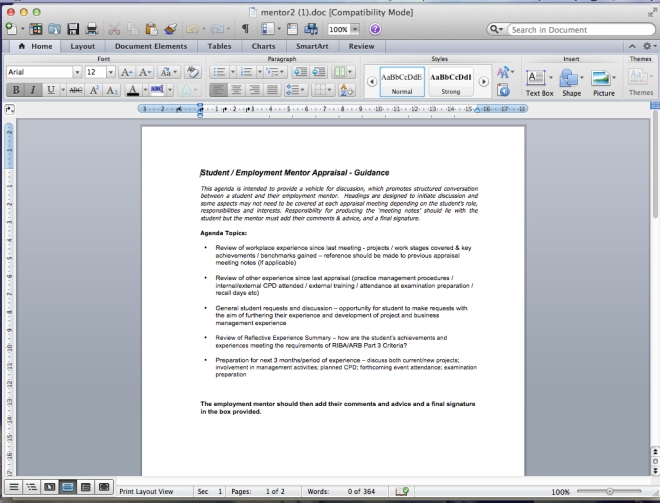
Student & Mentor Review. . .
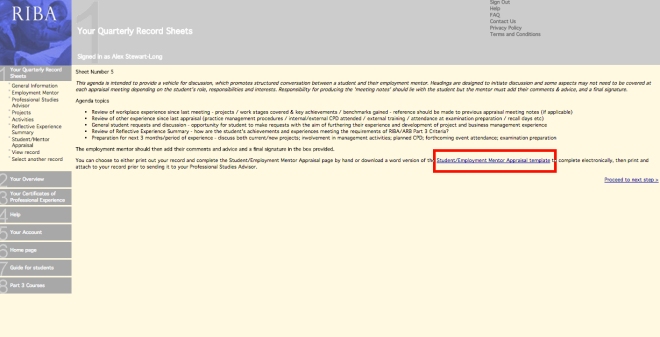
For this section you need to sit down with your mentor and have a review what you have done for the last three months. It should have positive and negative points, giving you guidance on what to work on in the next 3 month period, what you need to improve and what you have improved from the last three month period. It is also your chance to ask for experience or help in areas you are yet to gain any or are struggling with. On the PEDR website you will be taken to the page shown above, from here you click the link shown in the red box. This will download a word document which your mentor will fill out after your discussion. You then need to PDF this document and keep it safe.
View your record . . .
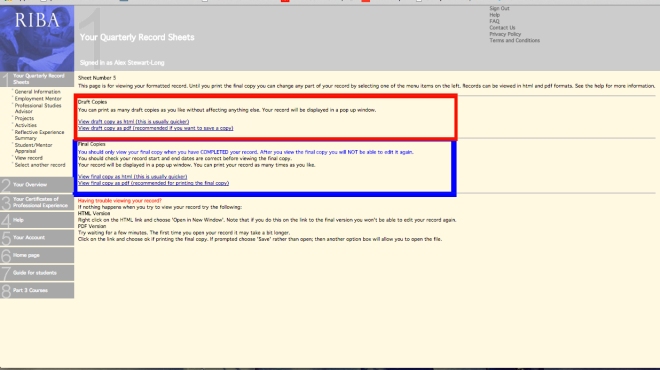
DO NOT CLICK FINAL COPY UNTIL YOU HAVE 100% FINISHED AS YOU WILL NOT BE ABLE TO EDIT THE RECORD AFTER.
If you want to see what your record looks like, or have a read through to check for any mistakes you can produce a draft copy that can be printed out. You can create as many draft copies as you like.
Final Copy : Once you have completed every section and your happy with your record you can click final copy and it will produce a PDF for you to save and send to the university.
Putting your sheets together. . .
So now you have finished you have a PDF of your PEDR record and a PDF of your mentors review. You can send this documents separated but my advise if you have full acrobat is to combine the PDF document and send one complete document to the university.
Hopefully the should send a complete document back with their section filled out however you may need to add their sheet in on acrobat also.
Sending them to the University. . .
PLEASE NOTE: Once your 3 month period is complete you have 2 months to fill in your PEDR record and hit ‘Final Copy’ on the PEDR website. You then need to email your document to your mentor at your chosen university. If you take longer than 2 months you can of course still submit your sheets but you may be questioned on this in your part 3 examination.
The university should then fill in the Professional Studies Advisor section and return the document to you. This however can take a while. The universities certainly see no rush in returning the records, which may be frustrating because suggestion they make for your next three month period may be returned to you when you have near completed this time frame. It is important that you make sure all your sheets are returned by the university.
What to do with your sheets once they are returned from the university?
KEEP YOUR RECORDS SAFE : You must keep a digital copy of your completed PEDR records for each 3 month period complete with the universities response safe as you will need this for your part 3. it is your sole responsibility not to lose these.
Although a copy of your records is kept on the PEDR website they will not have the universities response which is essential.
My personal advise would be to keep a digital copy at work, and a digital and hard copy at home.
Additional Guidance and advise
- WRITE EVERYTHING DOWN: Have a note pad at work that you write down your day to day activities and notes in. This makes your PEDR records a lot easier and you don’t forget anything. It’s also a good habit to get into as you have proof of what you did, what you were asked to do if you ever need it.
- DON’T LEAVE THEM TILL LAST MINUTE: Get them done and out the way, otherwise you will feel like they never end. As you finish one you suddenly realise its only a few weeks until you have to start the next one.
- ASK YOUR COMPANY ABOUT FEES: Each company is different but where I work, the company has a budget set aside for study which meant to paid for my PEDR fees. (Great hey?)
- KEEP MULTIPLE COPIES: It’s your responsibility to keep hold of your PEDR records until your part 3. This means you could need to keep them safe for many years. If they are lost it is tricky to resolve this.
- ASK FOR EXPERIENCES: If you don’t ask you could get stuck doing the same thing over and over. If your boss is aware that you want experience in different areas they are more likely to get you working in them.
- REFER TO THE PART 3 CRITERIA: This is what you are working towards, so if you can demonstrate you are meeting the criteria in your PEDR Records this will help you at Part 3 level. This criteria can be found HERE.
- EXAMPLE OF A COMPLETED SHEET: I didn’t find this very helpful but you may, for an example of a completed PEDR Sheet click HERE
I hope this guide is helpful, if you have any questions or comments feel free to comment or contact me via twitter. @alexstewartlong

Leave a comment